Texture Scatter 2D by Jens Kafitz |
Texture Scatter 2D is a complex texture bombing node, working in UV Space.
It is capable of generating seamless textures up to 32k resolution on any regular plane with full UV coverage.

|
DO NOT KEEP LIVE UNLESS CACHED OR HIDDEN Texture Scatter 2D Nodes are meant to be converted to paintable layers. Due to their impact on viewport performance it is absolutely not recommended to keep them live unless cached or hidden. |
It is recommended to complete your basic settings with a lower layer count, then up the count as a last step.
This is due to the much more random distribution of textures when not creating tileable textures.
A full demo & tutorial of the node is available here:
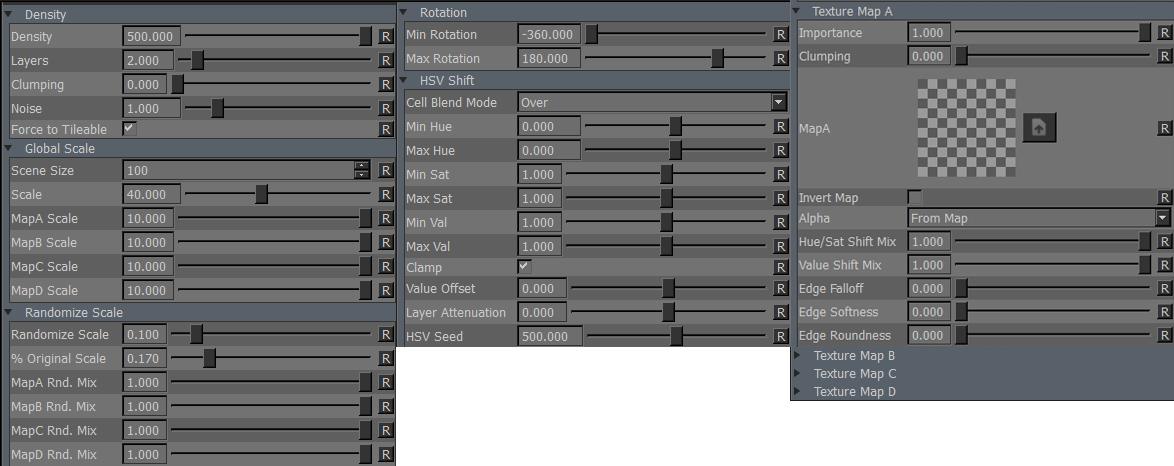
Determines how many cells will be filled with a texture. Overlap between cells is minimal.
Cells are generated regardless so increasing this value does have a large negative impact on your performance.
The amount of times the texture bombing runs. Increasing layer count will cause cells to overlap each other so it is
great for creating chaotic distribution such as fallen leaves.
It is recommended to complete your basic settings with a lower layer count, then up the count as a last step.
|
Values outside the slider range If you have to, you can enter numbers outside the slider range to get even more layers |
Clumping will remove textured cells to create clusters of features.
This Clumping slider is a global multiplier on the Clumping Sliders under groups 'Texture Map A' , 'Texture Map B' etc.
Please note that turning the Force to Tilable Mode off will result in a change in clumping behavior.
Due to the more random distribution of this mode, clumping will be a lot less pronounced.
Effects of Clumping with 'Force to Tilable' on (left) and off (right):
Determines the size of the Noise to be used to generate the cells and acts a little like a 'Seed' value.
Depending on your settings, density of textures might change a little.
With Force to Tileable turned on you will create a perfectly tileable texture when using it on a plane with full uv coverage
(such as a plane created in Maya).
Turning it off will change the internal algorithm that is used to place textures, applying an offset for each added layer.
This will create more random distribution but will no longer be tileable.
Scene Size is a multiplier for the Scale Values below allowing you to compensate for large or small scene sizes
by effectively changing the slider ranges.
The Scale of the Grid that is generated to place the texture cells.
Scale of each texture within the cell generated.
This allows you to set relationships between textures (sticks larger than leaves etc.).
The per Map Scale will not rescale the original grid cell but will just change the size of the texture within in the cell.
This can lead to gaps in your coverage.
Introduces random scaling of textures.
This will not rescale the original grid cell but will just change the size of the texture within in the cell.
This can lead to gaps in your coverage.
A percentage of all generated textures that should be kept at original size, set under 'Global Scale' Group.
A mixer for each texture how much it should be affected by the overall Randomize Scale
Minimum Rotation of each texture within its cell.
Maximum Rotation of each texture within its cell.
Different from the Layer Blend Mode, this determines how the cells are blended together between each other.
The minimum and maximum hue shift variation in degrees on a color wheel.
The minimum and maximum saturation variation.
The minimum and maximum value variation.
Some Cell Blend Modes such as Add can cause combined values of cells to go over 1.0. Clamp will clip the
resulting values below 0.0 and above 1.0
A global value shift on all textures. This is very useful together with Layer Attenuation to control Value buildup for bump or
displacement maps.
Note that Value Shift Mix on each each texture slot needs to be at 1.0 for it to have full effect.
The Value to be incrementally added or subtracted to the previous value for each Layer added on top.
This is great introduce changes on a per layer level so that features that are buried deeper have a darker value than the ones
on top. Use Value Offset to globally add or remove value.
Note that Value Shift Mix on each each texture slot needs to be at 1.0 for it to have full effect.
Effect of Layer Attenuation - Lower layers remain constant in value, upper layers get lifted
A randomization value for Hue / Saturation + Value Shift.
Activates the Texture Slot. Please note Texture Map A is always on.
A percentage how much the texture should contribute to the final result.
Lowering Importance on Texture Map A will remove textures and replace them with a transparent cell.
Adjust the Clumping for each texture separately.
Clumping will remove textured cells to create clusters of features.
The per texture Clumping sliders are multiplied with the global multiplier in group 'Density'.
Please note that turning the Force to Tilable Mode off under the 'Density' group will result in a change in clumping behavior.
Due to the more random distribution of this mode, clumping will be a lot less pronounced.
The Texture Map to be used for each slot. Transparency is supported.
Inverts the Texture Map used in the respective Texture Slot.
Determines the way the alpha of the texture slot should be evaluate:
The Transparency in your loaded texture map is used
The Luminance of your loaded texture map is used as Alpha.
Black is transparent.
The inverted Luminance of your loaded texture map is used as Alpha.
White is transparent.
Allows you to set per texture how much of the random Hue & Saturation Shift should be mixed in.
This is helpful to keep one of your maps closer to their original color without loosing variation on the other maps.
Allows you to set per texture how much of the random Value Shift should be mixed in.
Will contract the edges of your loaded textures
Will feather the edges of your loaded textures from the start of the Edge Falloff to the centre of your texture.
Switches the Falloff from Square (0.0) to Radial (1.0)
Unfortunately on Windows the Texture Scatter can let your display drivers time out during baking / flattening
when high Layer counts in the Node are set. This can happen even on the most high-end video cards
due to the hugely expensive texture bombing operations being run.
The 'crash' is the result of an automated 'timeout' setting in your windows registry after which Windows determines
your display driver is unresponsive -- even if it is in fact just busy with a complex operation.
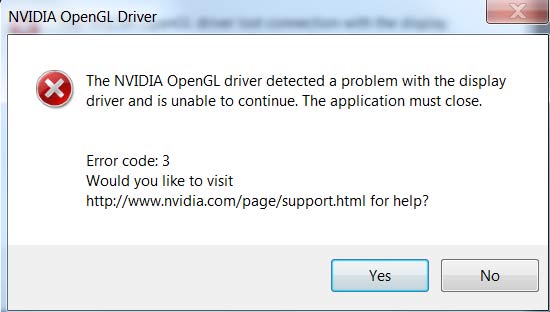
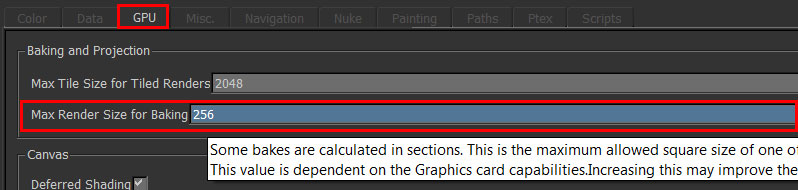
Working around the display driver timeout:
a continuous signal so it doesn't time out.
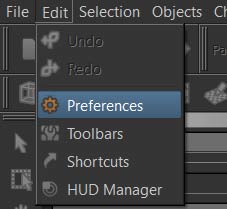
You can turn it back to default (1024) after you are done with the bombing procedure or leave it as is.
|
Notebook Users - plug in ! During my tests I noticed that a notebook that is operating on battery power can also throw the display driver crash during flattening, regardless of the 'Max Render Size for Baking' setting. I am assuming this is due to the Video Card not receiving enough power for the operations required. Find a power plug or change your Power plan to 'High Performance'. |
Disabling Windows Display Driver TimeOut completely:
It is possible to completely turn off the windows display driver time out.
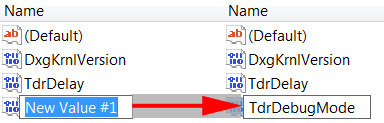
This requires adding a parameter in your windows registry:
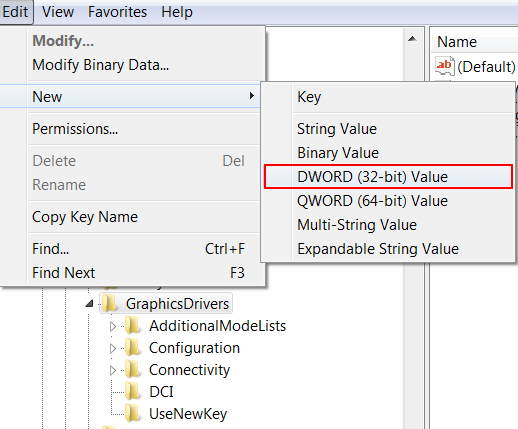
This name needs to be exact in order for windows to pick it up.
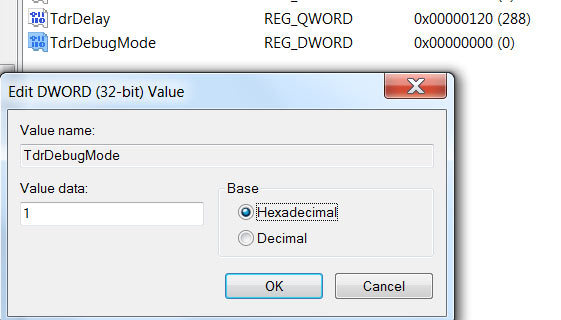
After reboot Windows will no longer reset the display driver no matter how long the operation lasts.
Created with the Personal Edition of HelpNDoc: Free CHM Help documentation generator