Dynamask by Jens Kafitz |
The Dynamask preset is a special Gizmo designed to give you full control over geometry dependent mask creation.
Different from the other Edge Wear presets it does not come pre-configured for a specific look but allows you to create
your own mask presets that you can save via the Mari Gizmo System (RMB / Node / Export Nodes)
|
Step by Step Video A Step-by-Step Video of the Installation process can be found here |
Gizmos (such as Dynamask) will not be automatically installed with MARI Extension Pack 3 R2.
You can find the Gizmos as part of the MARI Extension Pack 3 R2 Preset ZIP File you downloaded on purchase.
To install them please copy the /Presets/Mask Presets/ Folder from the ZIP File into the location of your
MARI Gizmos Folder. This is usually
If the subfolder GIZMOS does not exist on your machine, you might have to create it yourself.
Mari will load any file found as a single node you can create via the Nodegraph / Right Mouse Click / Add Nodes Menu.
In order to place a node in a submenu structure, place the Nodes in any Subfolder within a GIZMOS load directory.
The Dynamask Preset comes in 3 different variations - each one pre configured to best suit a task.
General structure between presets is largely the same with only changes in default parameters.
The Dynamask Neutral preset is slightly different internally with a different order of operations.
The Dynamask Neutral Preset is preconfigured to work best off a 50% grey mask base.
By working with a base of 50% grey you can both lighten and darken using blendmodes to either
Hide a material or reveal a material.
The Directional Gradient and Object Space Directions Order of Operations are moved in this preset to be evaluated right after
the Mask Base making the internal node order different from the
Dynamask Hide & Dynamask Reveal Presets
The Dynamask Reveal Preset is preconfigured to work best off a White mask base,
completely showing a material at first then slowly hiding parts of it to reveal
materials beneath it.
The internal node structure of this preset is identical to the Dynamask Hide preset,
with just Blendmodes, Peak Values and Mask Base defaults changed.
The Dynamask Hide Preset is preconfigured to work off a Black mask base,
completely hiding a material at first then adding white to reveal it.
The preset is preconfigured to best support additive mask generation.
The internal node structure of this preset is identical to the Dynamask Reveal preset,
with just Blendmodes, Peak Values and Mask Base defaults changed.
Once installed, the Dynamask preset can be added via the Nodegraph...
The Dynamask in the Mask presets Submenu
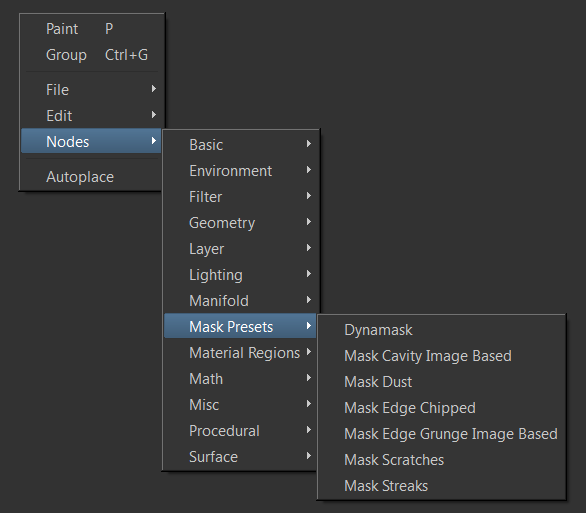
.. resulting in a Node being added to your Graph.
The Dynamask Node
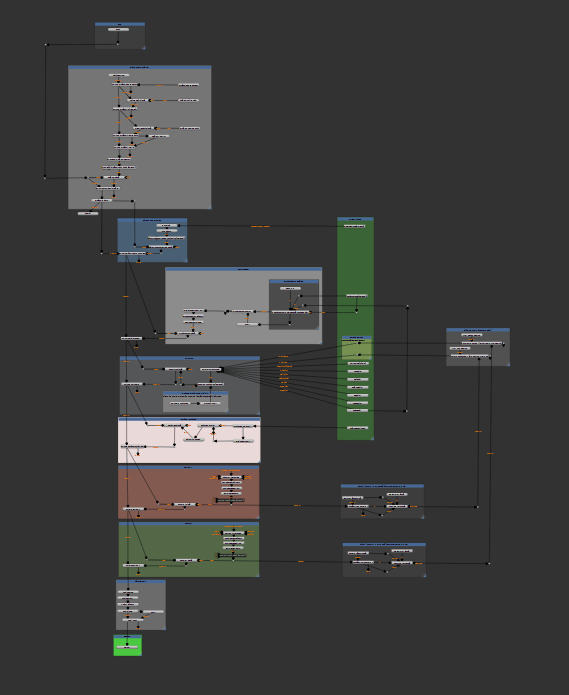
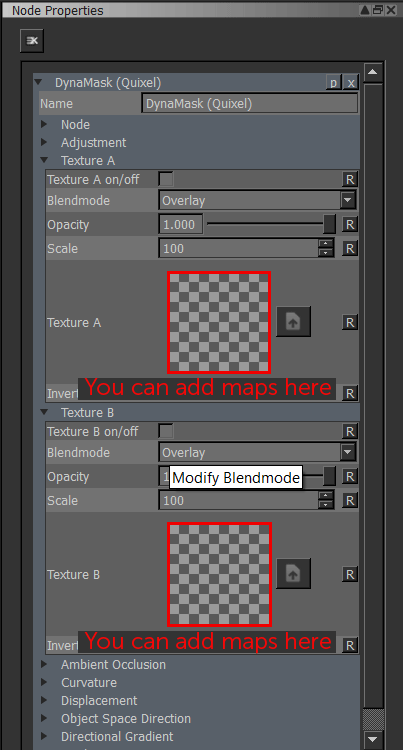
By double-clicking on the Node you will get to its Node Properties and open
the group to see the internal wiring of the node.
You can get back to your Main Nodegraph by switching back to the 'Root' Tab
at the top of the Nodegraph.
The Internal Wiring of the Dynamask Neutral Preset
The Dynamask has different Attributes from the internal wiring exposed to its
Nodeproperties to facilitate quick changes without the need to go digging through the internal workings of the Preset.
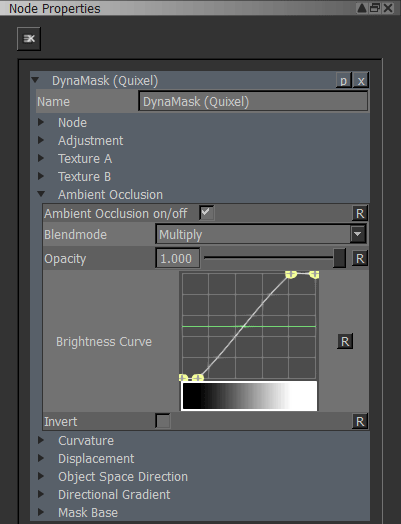
You can get to the exposed Attributes via the Node properties Palette.
The exposed Attributes of the Dynamask seen via the Node Properties Palette.
The Dynamask requires a set of input maps to work properly.
Which Maps are required depends on which options you are going to use but at the minimum this is usually a Curvature or Ambient Occlusion Map.
Input Maps need to be attached to the exposed Node Handles of the Preset Node (for example via Paintable Nodes or Image Nodes)
The necessary Maps can be baked inside of Mari using the internal MODO Bake (accessible via MODO Render Palette) or
brought in from an external baking solution such as XNormal, MightyBake or similar.
Maps are attached to the exposed Handles of the Nodes
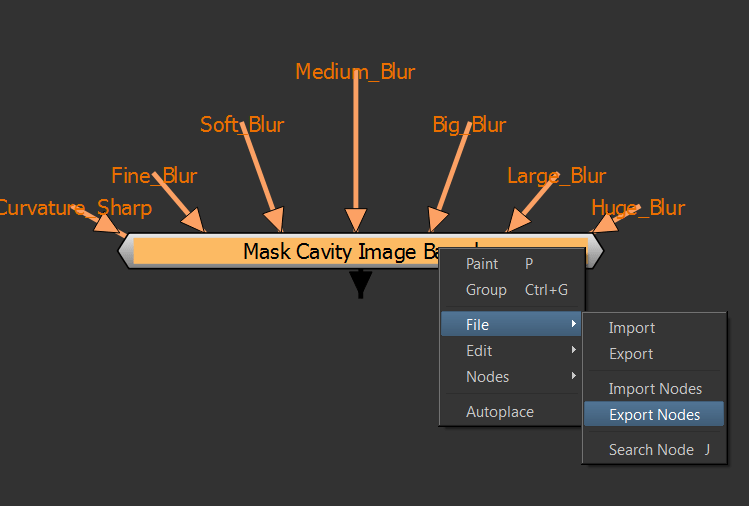
Curvature based effects in the Dynamask Preset utilize the Mask from Curvature Node.
|
Mask from Curvature Node For best use of the Presets it is highly recommended you familiarize yourself with the Mask from Curvature Node:
|
The Node is an Image Processing Node designed to blend together different blurred Versions of a single Curvature Map.
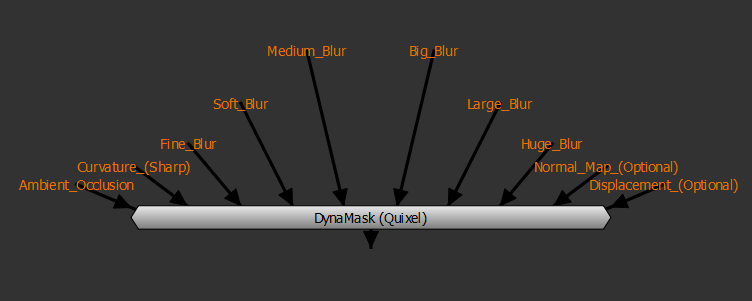
On the Dynamask Node you will see some Handles labeled
These Node handles are used internally by the Mask from Curvature Node. For best results you are expected to create differently blurred version
of your curvature map either in Mari or in external programs such as Nuke or Photoshop.
For an in-depth step-by-step please refer to the Step-by-Step Setup of the Mask from Curvature Node.
The Dynamask Preset with different Maps attached
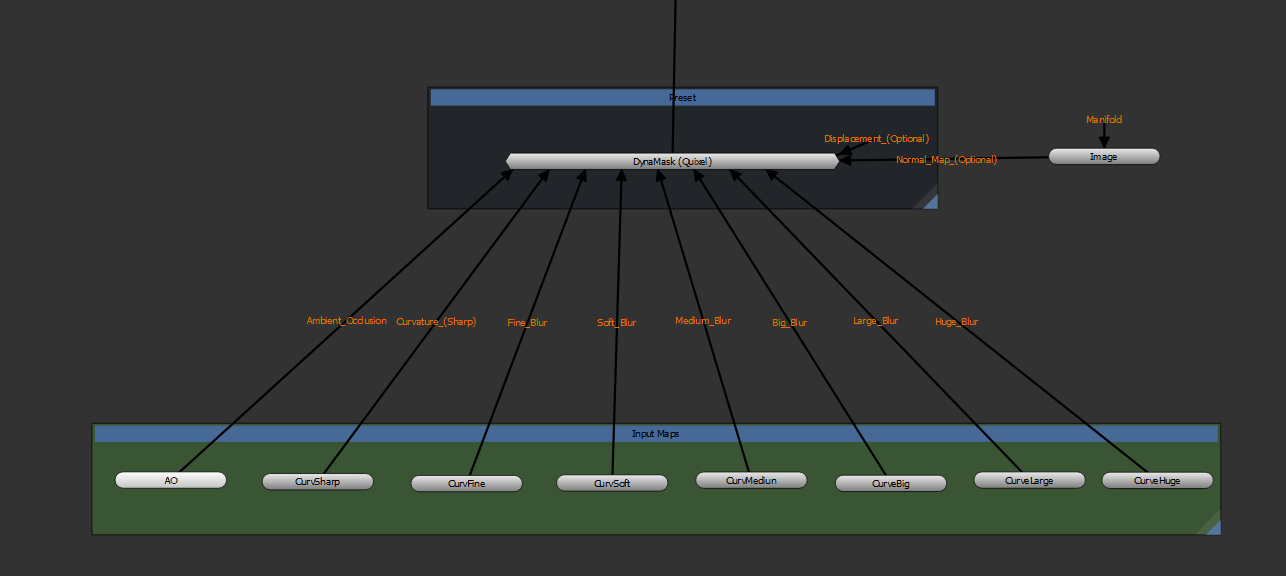
The Dynamask Presets allows you to add projected Images as part of the mask generation.
These Input Maps can be any grunge map of your choosing, resulting in different looks to the preset.
Maps are added to the Texture A or Texture B Groups (or both).
The Texture A and Texture B Groups of the Dynamask allow you to add Texture Maps
Maybe you configured a DynaMask and want to save it for future use ?
Simply select the Preset Node (Gizmo): Right mouse click / File / Export Nodes.
If you save the File into a Gizmo Directory read by Mari, next time you start Mari it will be available from the Add Nodes Menu
Saving out a new preset

Attach a baked Ambient Occlusion Map to this handle
Attach a baked Curvature Map to this handle.
For best results, the Curvature Map should have a (linear) grey midpoint and both concave and convex features as black and white.
You can bake such a map using the Modo Bake Presets provided with Extension Pack.
Attach differently blurred versions of your original sharp curvature map.
The range of blur should be thought of as your 'fine' to 'middle' edge detail range.
You can create these blurred versions by duplicating the original Curvature Map and applying incremental blurs to them via the
Filter Menu. Alternatively use external solutions such as Nuke or Photoshop to create the necessary blurred maps.
Refer to the Step-by-Step Setup of the Mask from Curvature Node for more detailed explanations.
Attach differently blurred versions of your original sharp curvature map.
The range of blur should be thought of as your your medium to large edge detail range extending
all the way across a surface.
You can create these blurred versions by duplicating the original Curvature Map and applying incremental blurs to them via the
Filter Menu. Alternatively use external solutions such as Nuke or Photoshop to create the necessary blurred maps.
Refer to the Step-by-Step Setup of the Mask from Curvature Node for more detailed explanations.
Attach a Displacement or Bump map (layer or channel) to this handle to allow you to take it into account during mask generation.
If the Handle is not attached to anything and something is attached to the Huge Blur Handle, the Huge Blur Handle will be used instead.
Attach a Tangent Space Normal Map (layer or channel) to this handle to allow you to take it into account during mask generation.
Detail from the Normal Map will be taken into account when using the Object Direction masking options.
The Node properties are evaluated Top to Bottom, meaning that any Property that sits at the top of the list
will affect Properties below it.
The Adjustment Group allows you to make final modifications to your Mask.
The exposed Parameters on the Dynamask Node correspond to the Backdrop Adjustment in the Gizmo:
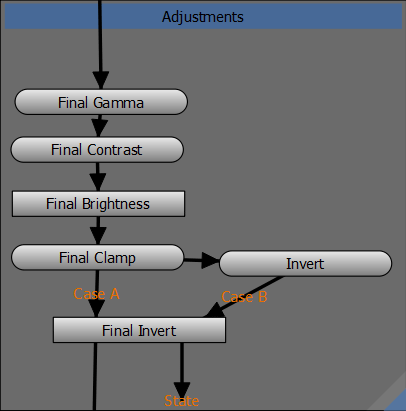
Will adjust the Gamma of the final Mask Output.
Gamma is evaluated before Contrasting.
Will adjust the Brightness of the final Mask Output.
Brightness is evaluated after Contrasting
Will adjust the Contrast of the final Mask Output
Determines Midpoint Value that is used to contrast values from.
Inverts the final Mask Output
Texture A / Texture B |
The Texture A and Texture B groups allow you to add Texture Maps to your Masks.
Maps are projected using Axis Projections Nodes.
You can adjust the Projection Nodes in more Detail on the Axis Projection Nodes within the Gizmo Network.
The exposed Parameters on the Dynamask Node correspond to the Backdrops TextureA & Texture B in the Gizmo:
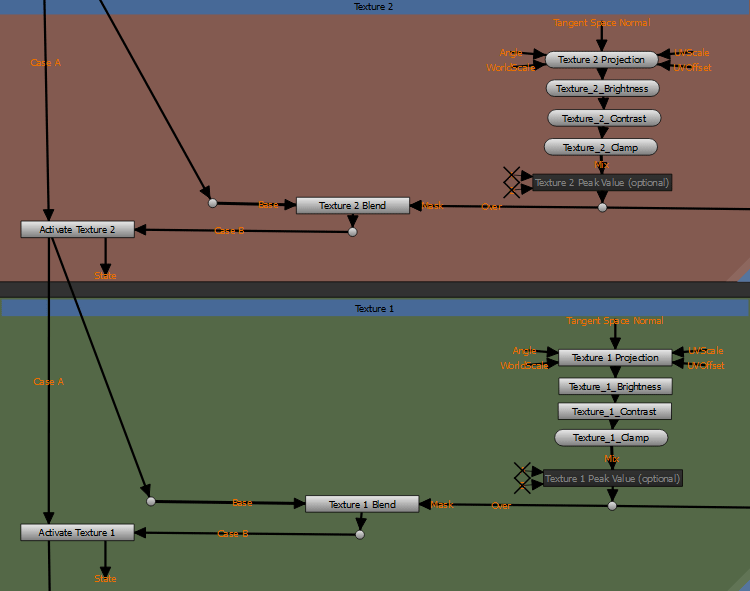
Activates or deacitvates the Texture Contribution to the Mask
The Blendmode used to composite the Texture over all previous Mask effects
The Opacity used to composite the Texture over all previous Mask effects
The Scale the texture should be projected onto the surface with.
The Map that is projected onto the geometry with this Texture slot
Brightness Adjustment for the Map in the Texture Slot
Contrast Adjustment for the Map in the Texture Slot
Contrast Pivot for Conrasting of the Map in the Texture Slot
Inverts the Texture in the Texture Slot of the Group. Inverting is done after Brightness & Contrast.
Ambient Occlusion |
The Ambient Occlusion Group will add the effects of a map attached to the Ambient Occlusion Nodegraph
Connection to the Mask.
The exposed Parameters on the Dynamask Node correspond to the Backdrop Ambient Occlusion in the Gizmo:
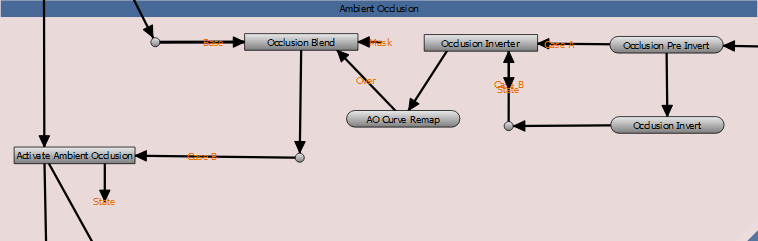
Activates or deacitvates the Occlusion Contribution.
The Ambient Occlusion Nodegraph Connection needs to be mapped for it to work.
The Blendmode used to composite Occlusion over all previous Mask effects
The Opacity used to composite Occlusion over all previous Mask effects
Allows you to adjust the values of the Occlusion along a Curve
Inverts the Occlusion
The Curvature Group will add the effects of the maps attached to the
Curvature Sharp, Fine Blur, Soft Blur, Medium Blur, Big Blur, Large Blur and Huge Blur Nodegraph Connections
to the Mask. Refer to the Step-by-Step Setup of the Mask from Curvature Node for more detailed explanations.
The exposed Parameters on the Dynamask Node correspond to the Backdrop Curvature in the Gizmo:
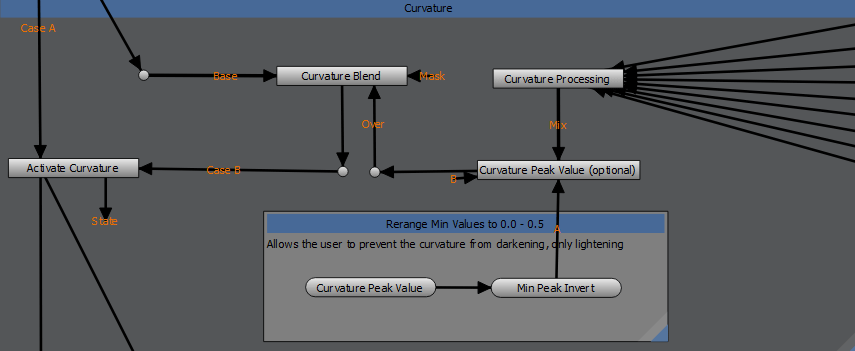
Activates or deacitvates the Curvature Contribution.
The Curvature and Blur Nodegraph Connection needs to be mapped for it to work.
The Blendmode used to composite Curvature Contribution over all previous Mask effects
The Opacity used to composite Curvature Contribution over all previous Mask effects
Sets the maximum Value Range that the Curvature is allows to output. At 1.0 the Curvature will be full white to full black.
At 0.5 the Curvature will be full white to 50% grey.
Determines how the attached Curvature Maps are processed
Raw gives a raw view of all your Curvature Maps layered together using a default, non-compressing Blendmode (Overlay).
The Blendmode used can be modified under the Advanced Options of the Mask from Curvature Node in the gizmo via the Raw Blending Setting.
Edges layers your Maps according to the Blendmodes set under Curvature Blending of the Mask from Curvature Node and the opacity set in the
Curvature Influence Sliders. Processing of Maps is skewed towards isolating values over 0.5 (edges).
Cavities layers your Maps according to the Blendmodes under Curvature Blending of the Mask from Curvature Node and the opacity set in the
Curvature Influence Sliders. Processing of Maps is skewed towards isolating values below 0.5 (cavities).
Dual layers your Maps according to the Blendmodes under Curvature Blending of the Mask from Curvature Node and the opacity set in the
Curvature Influence Sliders. Processing is done in both 'Edge' and 'Cavities' Mode, then the result is layered together
according to a blendmode. The Blendmode used can be modified under the Advanced Options of the Mask from Curvature Node Cavity/Edge Blending (Dual) Setting
The Brightness of the combined effect of all Curvature Maps
The Contrast of the combined effect of all Curvature Maps
Inverts tthe Result of the Curvature Group
Determines the percentage each differently blurred Curvature Map should contribute to the Fine-Medium Edge Detail.
Determines the percentage each differently blurred Curvature Map should contribute to the Large Edge Detail.
Displacement |
The Displacement Group activates the Contribution of any Displacement Map or Channel attached to the Displacement Nodegraph Connection.
If the Displacement Nodegraph Connection is not mapped and something is mapped to the Huge_Blur Connection, the Input is used from there.
The exposed Parameters on the Dynamask Node correspond to the Backdrop Displacement in the Gizmo:
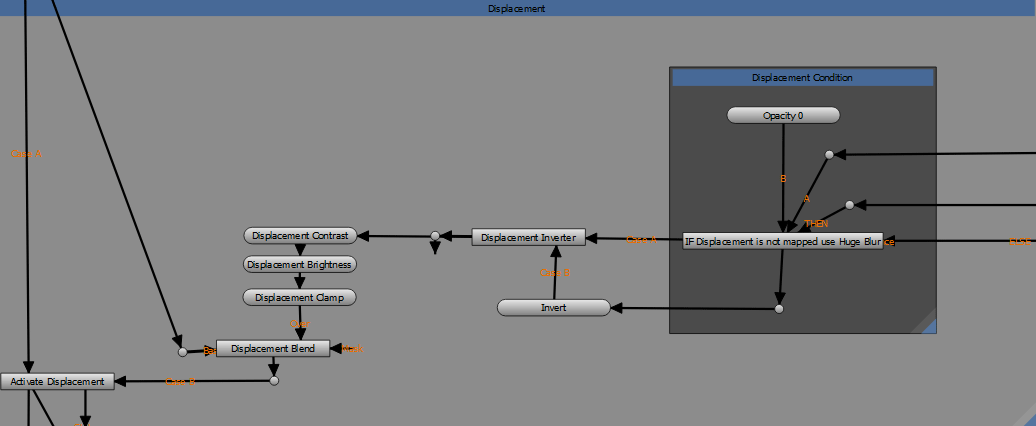
Activates or deacitvates the Displacement Contribution.
The Displacement or Huge_Blur Nodegraph Connections needs to be mapped for it to work.
The Blendmode used to composite the Displacement over all previous Mask effects
The Opacity used to composite Displacement over all previous Mask effects
The Brightness of the Displacement
The Contrast of the Displacement
By default a Contrast Pivot of 0.5 is used, which can be changed by accessing the Contrast Node in the Displacement Backdrop within the Gizmo.
Inverts the Displacement
The Object Space Direction Group adds directional masking capabilities to the Dynamask Preset.
By attaching a Normal Map to the Normal Map Nodegraph Connection, directional effects respect Normal Map Details as well.
The exposed Parameters on the Dynamask Node correspond to the Backdrop Object Space Direction in the Gizmo:
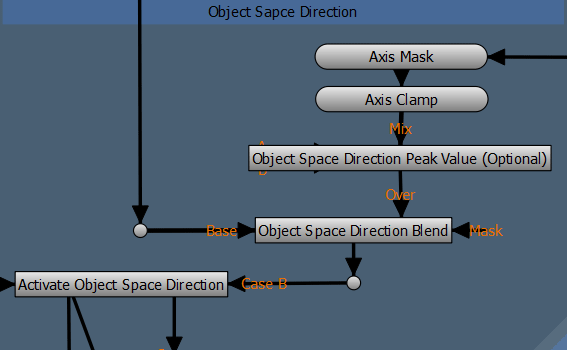
Activates or deacitvates the Directional Mask Contribution.
The Blendmode used to composite the Directional effects over all previous Mask effects
The Opacity used to composite the Directional effects over all previous Mask effects
Inverts the current result of the Mask generation for Object Space Direction
Sets the maximum Value that the Object Space Direction is allows to output. At 1.0 the Mask will be full white to full black.
At 0.5 the Mask will be 50% grey to black
Masks the object from the positive and/or negative X Axis
Masks the object from the positive and/or negative Y Axis
Masks the object from the positive and/or negative Z Axis
Allows you to rotate the global X, Y and Z axis separately to best suite your models need.
Directional Gradient |
The Directional Gradient Group adds a gradient over your object.
The exposed Parameters on the Dynamask Node correspond to the Backdrop Directional Gradient in the Gizmo:
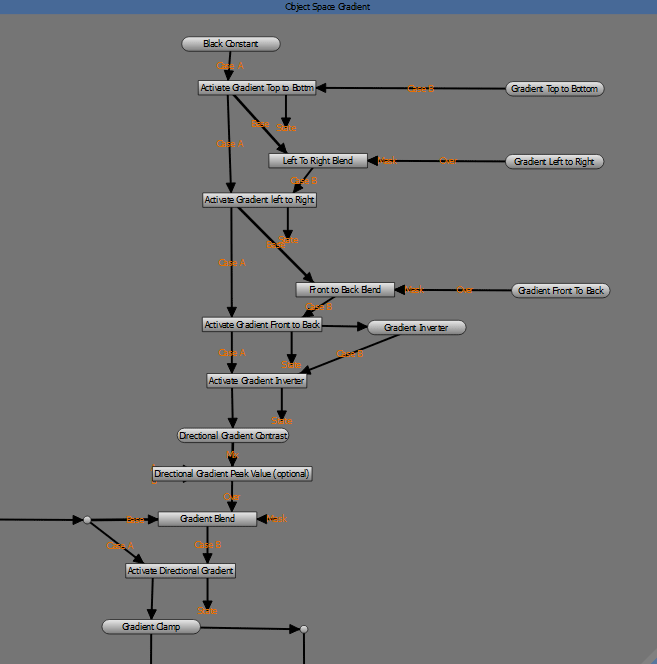
Activates or deacitvates the Directional Gradient Mask
The Blendmode used to composite the Directional effects over all previous Mask effects
The Opacity used to composite the Directional effects over all previous Mask effects
Adds a Black to White Gradient from the Top to the Bottom of your object
Adds a Black to White Gradient from the Left to the right of your object
Adds a Black to White Gradient from the Front to the Back of your object
Sets the maximum Value that the Gradient is allows to output. At 1.0 the Mask will be full white to full black.
At 0.5 the Mask will be 50% grey to black
Allows you to tweak the profile of the gradient to something other than linear.
Allows you to contrast the Gradient
Inverts the Gradient
Mask Base |
The exposed Parameters on the Dynamask Node correspond to the Backdrop Base in the Gizmo:
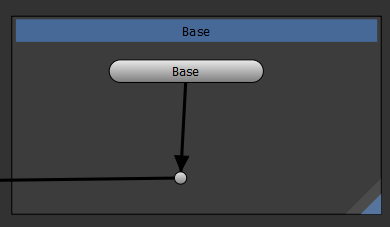
Determines the Base Value that all other Mask effects are composited over. Default is 50% grey so blend modes
using a midpoint of grey work by default.
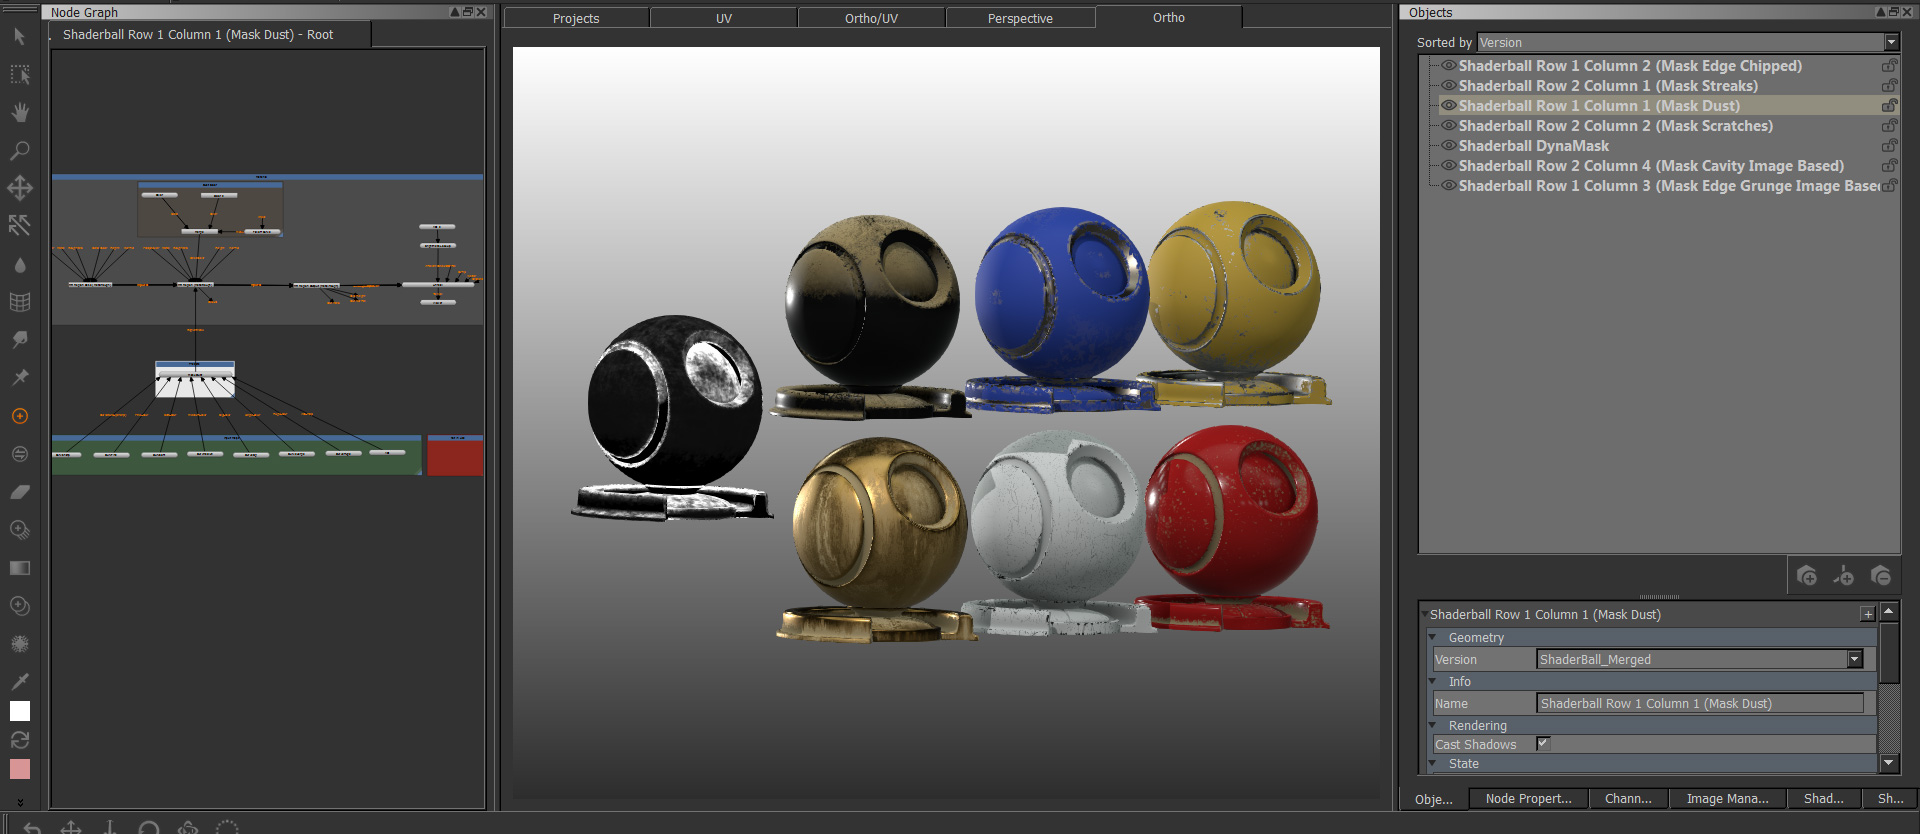
The sample archive shown below, complete with baked maps is available for download as part of your purchase.
Created with the Personal Edition of HelpNDoc: Easily create HTML Help documents