Height Blend by Jens Kafitz |
The Height Blend Node allows you to blend together two Height/Displacement or Bump maps. It is capable of outputting either
the combined new Height or a Mix Mask that you can use to blend entire materials.
To Materials blended together using a Height Blend Node's Mask Output

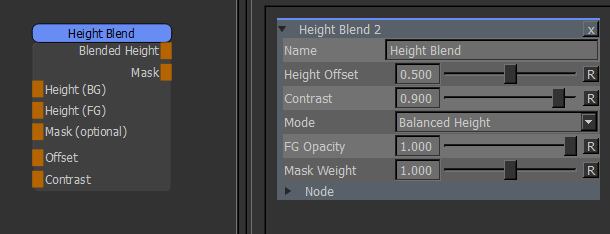
The Height Map for the Bottom Layer
The Height Map for the Top Layer
Exclude areas from being affected by the FG Height.
Applies an Offset to the Top Layer Height Map. Overwrites the Height Offset Slider of the Node
Determines the contrast of the Blending Mask generated between Top and Bottom Layer. Overwrites the Contrast Slider of the Node
A combined Height Map from the Bottom and Top Layer
A Mask how the Bottom and Top Layer have been combined that can be used for Material Blending
Applies an Offset to the Top Layer Height Map
Determines the contrast of the Blending Mask generated between Top and Bottom Layer
Determines the algorithm used to combine the two height maps
Will constantly re balance the two height maps to achieve a realistic result
The BG Height will remain unchanged and the FG Height is 'moved' through it.
Applies a simple Opacity to the Mask used to blend the FG Height over the BG Height, meaning the mask will
get more weight added uniformly
You can use a Mask attached to the Mask (optional) Nodeport to exclude areas from
being affected by the FG Height.
The Mask Weight affects the attached Mask or acts against a value of 1.0 if no Mask is attached.
When the Mask Weight is 1.0 or lower it multiplies against the attached Mask or 1.0 if no Mask is attached
When the Mask Weight is larger than one it adds a value to the Mask making the Mask go overall more towards a constant
value of 1.0
Created with the Personal Edition of HelpNDoc: Generate EPub eBooks with ease